Mac Os X Download For Windows 10 UPDATED
Mac Os X Download For Windows 10
Windows 10 is a peachy operating system. It has its quirks and annoyances, simply which operating system doesn't? Fifty-fifty if you're beholden to Microsoft and Windows 10, you can all the same shop around.
What better manner to do that than from the safe confines of your existing operating system with a virtual automobile? This manner, you can run macOS on Windows, which is perfect for using Mac-simply apps on Windows.
So, here'south how you lot install macOS in a virtual machine on Windows, making a virtual Hackintosh that lets y'all run Apple tree apps from your Windows automobile.
What Files Do You Need to Create a macOS Virtual Auto on Windows 10?
Before delving into the "how-to," you need to download and install the essential tools. The tutorial details how to create macOS virtual machines using both Oracle VirtualBox Manager (VirtualBox) and VMware Workstation Player (VMware Role player).
- Download the latest version of VirtualBox. This tutorial uses VirtualBox 6.i.22
- Download the latest version of VMware Histrion. This tutorial uses VMware Player sixteen
You demand a copy of macOS, too. Big Sur is the latest macOS version. Yous can discover the download links for macOS Big Sur in the next section.
This tutorial will focus on installing macOS Large Sur in a virtual machine running on Intel hardware, using either VirtualBox or VMware Player.
Unfortunately, I do not have access to whatsoever AMD hardware, so I cannot provide a tutorial.
At that place is, still, the code snippet that anyone using an AMD system requires to kicking a macOS Big Sur using VMware on AMD hardware.
Launching the macOS Big Sur virtual car is the aforementioned as the Intel version but uses a slightly different code snippet. Y'all can discover the tutorial and the code snippet in the department beneath.
Furthermore, yous will detect links to several AMD macOS Catalina, Mojave, and Loftier Sierra virtual motorcar tutorials, at the end of the article.
Download macOS Big Sur Virtual Image
Use the download links below to download the macOS Big Sur image for both VirtualBox and VMware.
Download: macOS Big Sur Virtual Machine Prototype
Download: VMware Player Patch Tool
How to Create a macOS Big Sur Virtual Motorcar With VirtualBox
Before creating the macOS virtual machine, you need to install the VirtualBox Extension Pack. It includes fixes for USB 3.0 support, mouse and keyboard support, and other useful VirtualBox patches.
Download: VirtualBox Extension Pack for Windows (Free)
Scroll downwardly, select All supported platforms to download, then double-click to install.
1. Create the macOS Large Sur Virtual Machine
Open up VirtualBox. Select New. Blazon macOS.
VirtualBox volition discover the Os as you blazon and will default to Mac OS X. Y'all can leave this as is.
Regarding the virtual machine name, brand it something memorable yet easy to type. You'll need to input this proper noun in a series of commands, and it is frustrating to type a complicated proper name multiple times!
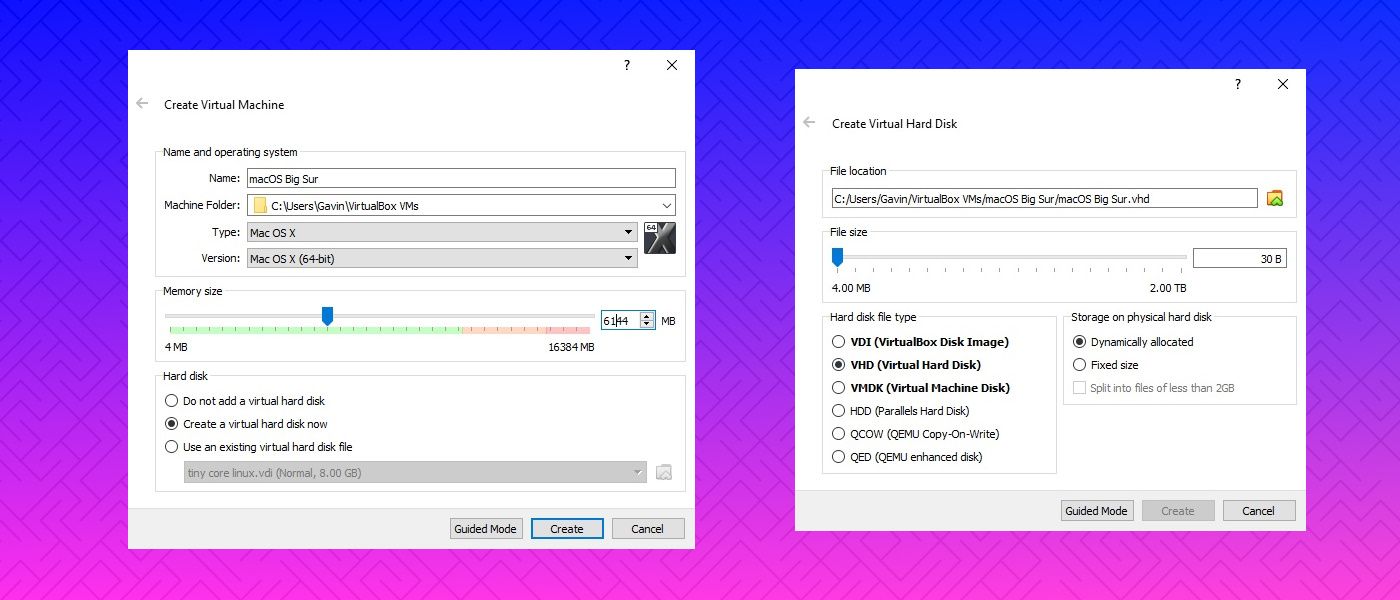
Side by side, set the amount of RAM the macOS virtual car can use. I would suggest a minimum of 4GB, but the more y'all can requite from the host system, the better your feel.
Remember, y'all cannot assign more RAM than your organization has bachelor, and you need to leave some memory available for the host operating arrangement.
Now, select Create a hard deejay at present and select Create. On the next screen, select Virtual Hard disk, then set the disk size to a minimum of 50GB, merely ideally more than if you lot can spare the space. macOS Big Sur requires at least 35GB of storage.
2. Edit the macOS Big Sur Virtual Machine Settings
Don't try and first your macOS Large Sur virtual machine yet. Before firing the virtual auto upward, y'all need to make a few tweaks to the settings. Right-click your macOS virtual machine and select Settings.
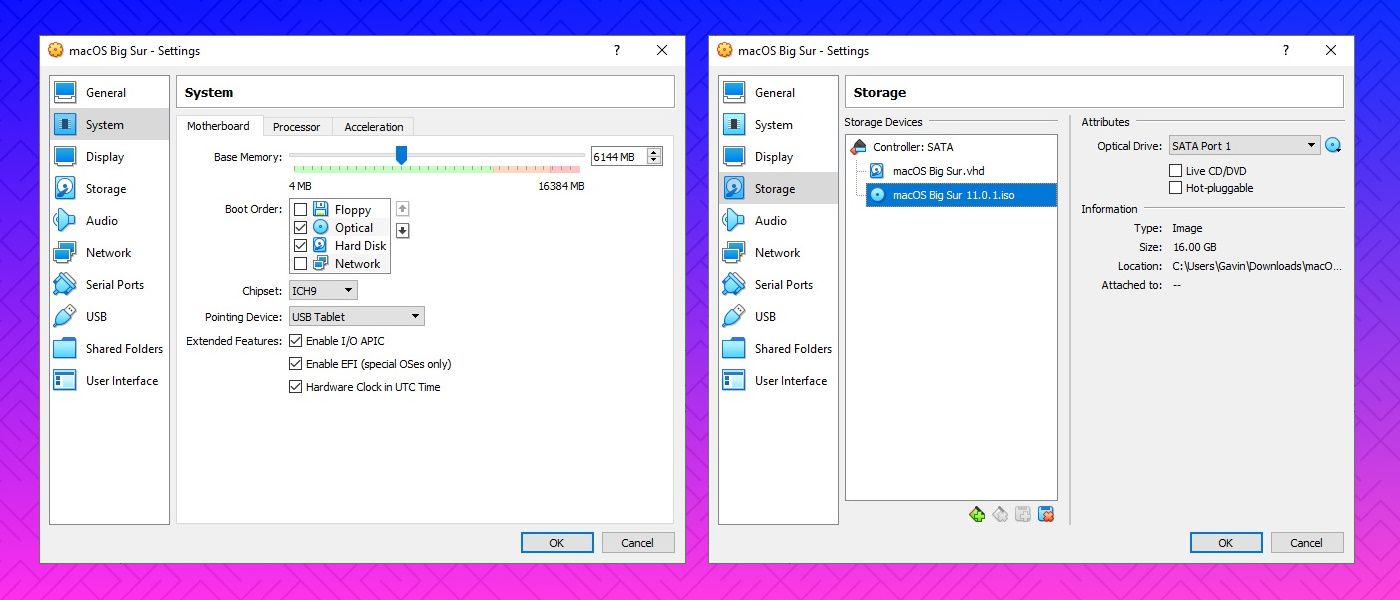
- Under System, remove Floppy from the boot gild. Ensure the Chipset is set to ICH9.
- Select the Processor tab. Assign ii processors. If you have a CPU with power to spare (such as an Intel Cadre i7 or i9 with multiple extra cores), consider assigning more. However, this isn't vital.
- Brand sure the Enable PAE/NX box is checked.
- Under Brandish, set up Video Retentiveness to 128MB.
- Now, under Storage, select the bare disc under Storage Devices. Next, select the disk icon alongside Optical Drives. Browse to and select your macOS Large Sur deejay image.
- Finally, head to the USB tab and select USB 3.0, then printing OK.
iii. Apply the Command Prompt to Add together Custom Lawmaking to VirtualBox
It still isn't quite fourth dimension to fire up your macOS Large Sur virtual machine. In its current configuration, VirtualBox doesn't work with your macOS disk image.
To go it upwards and running, y'all take to essentially patch VirtualBox before the macOS virtual machine volition function. To do this, you need to enter some code using the Command Prompt. All the details are below.
Offset past endmost VirtualBox. The commands will not execute properly if VirtualBox or any of its associated processes are running.
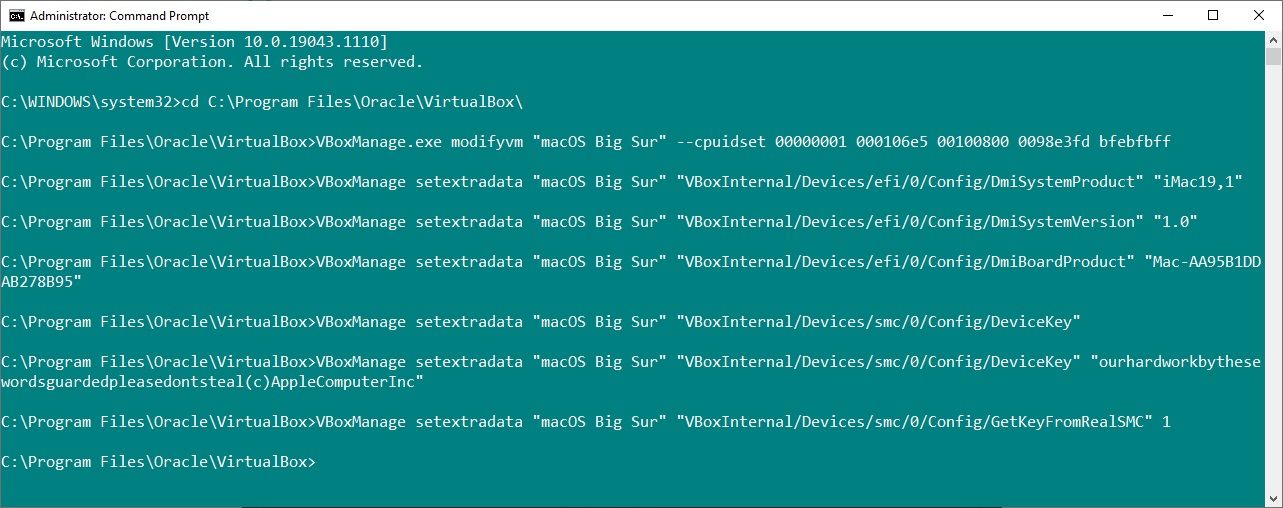
Once airtight, press the Windows key + X, so select Command Prompt (Admin) from the bill of fare. If your menu simply shows the PowerShell option, type command into your Start menu search bar. So right-click the Best Match, and select Run as Administrator. Use the following control to locate the Oracle VirtualBox directory:
cd "C:\Program Files\Oracle\VirtualBox\" Now, enter the following commands, 1 by one. Adjust the command to lucifer the proper noun of your virtual machine. For instance, my virtual machine proper name is macOS Big Sur.
Here are the commands:
          VBoxManage.exe modifyvm "macOS Big Sur" --cpuidset 00000001 000106e5 00100800 0098e3fd bfebfbff
VBoxManage setextradata "macOS Big Sur" "VBoxInternal/Devices/efi/0/Config/DmiSystemProduct" "iMac19,ane"
VBoxManage setextradata "macOS Big Sur" "VBoxInternal/Devices/efi/0/Config/DmiSystemVersion" "ane.0"
VBoxManage setextradata "macOS Big Sur" "VBoxInternal/Devices/efi/0/Config/DmiBoardProduct" "Mac-AA95B1DDAB278B95"
VBoxManage setextradata "macOS Large Sur" "VBoxInternal/Devices/smc/0/Config/DeviceKey" "ourhardworkbythesewordsguardedpleasedontsteal(c)AppleComputerInc"
VBoxManage setextradata "macOS Big Sur" "VBoxInternal/Devices/smc/0/Config/GetKeyFromRealSMC" 1
After the completion of the commands and presuming you encountered no errors, close the Command Prompt.
4. Kicking Your macOS Large Sur Virtual Automobile
Reopen VirtualBox. Double-click your macOS virtual machine to start it. You will see a long stream of text, followed by the Apple logo. On the adjacent screen, select your language of choice, then Continue.
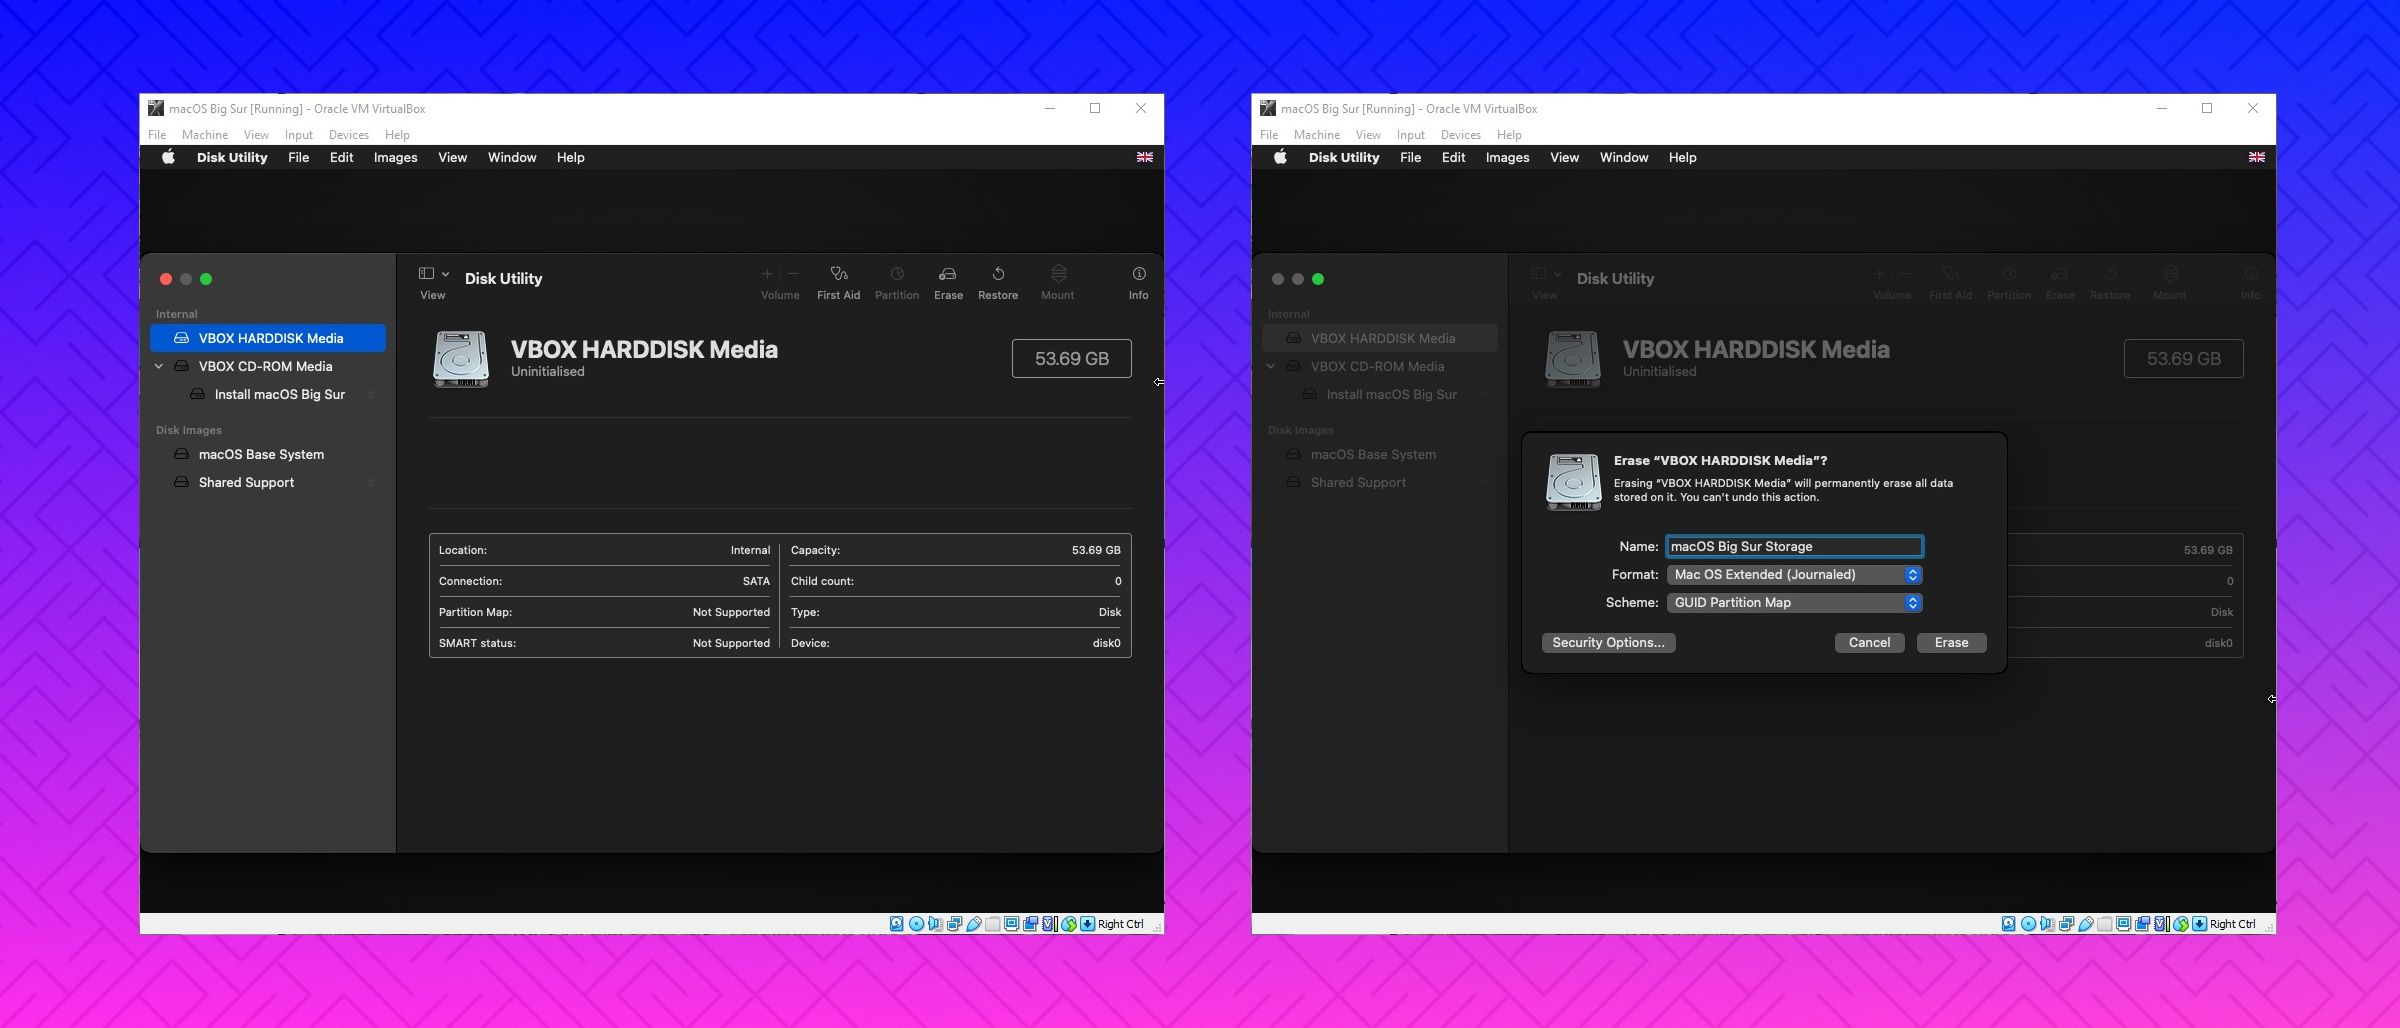
- Adjacent, select Disk Utility. You lot create a clean drive for macOS Big Sur to install to.
- In the Deejay Utility, select VBOX HARDDISK MEDIA from the Internal drive column.
- After selecting the drive, caput to the Erase option found at the height of the utility.
- Give your drive a proper noun, set the Format to Mac Bone Extended (Journaled), and the Scheme to GUID Partition Map.
- Select Erase.
- One time complete, you can exit the Deejay Utility dorsum to the Large Sur recovery screen. From here, y'all should select Install macOS Big Sur.
- Select the drive you created in the Disk Utility, followed by Go along.
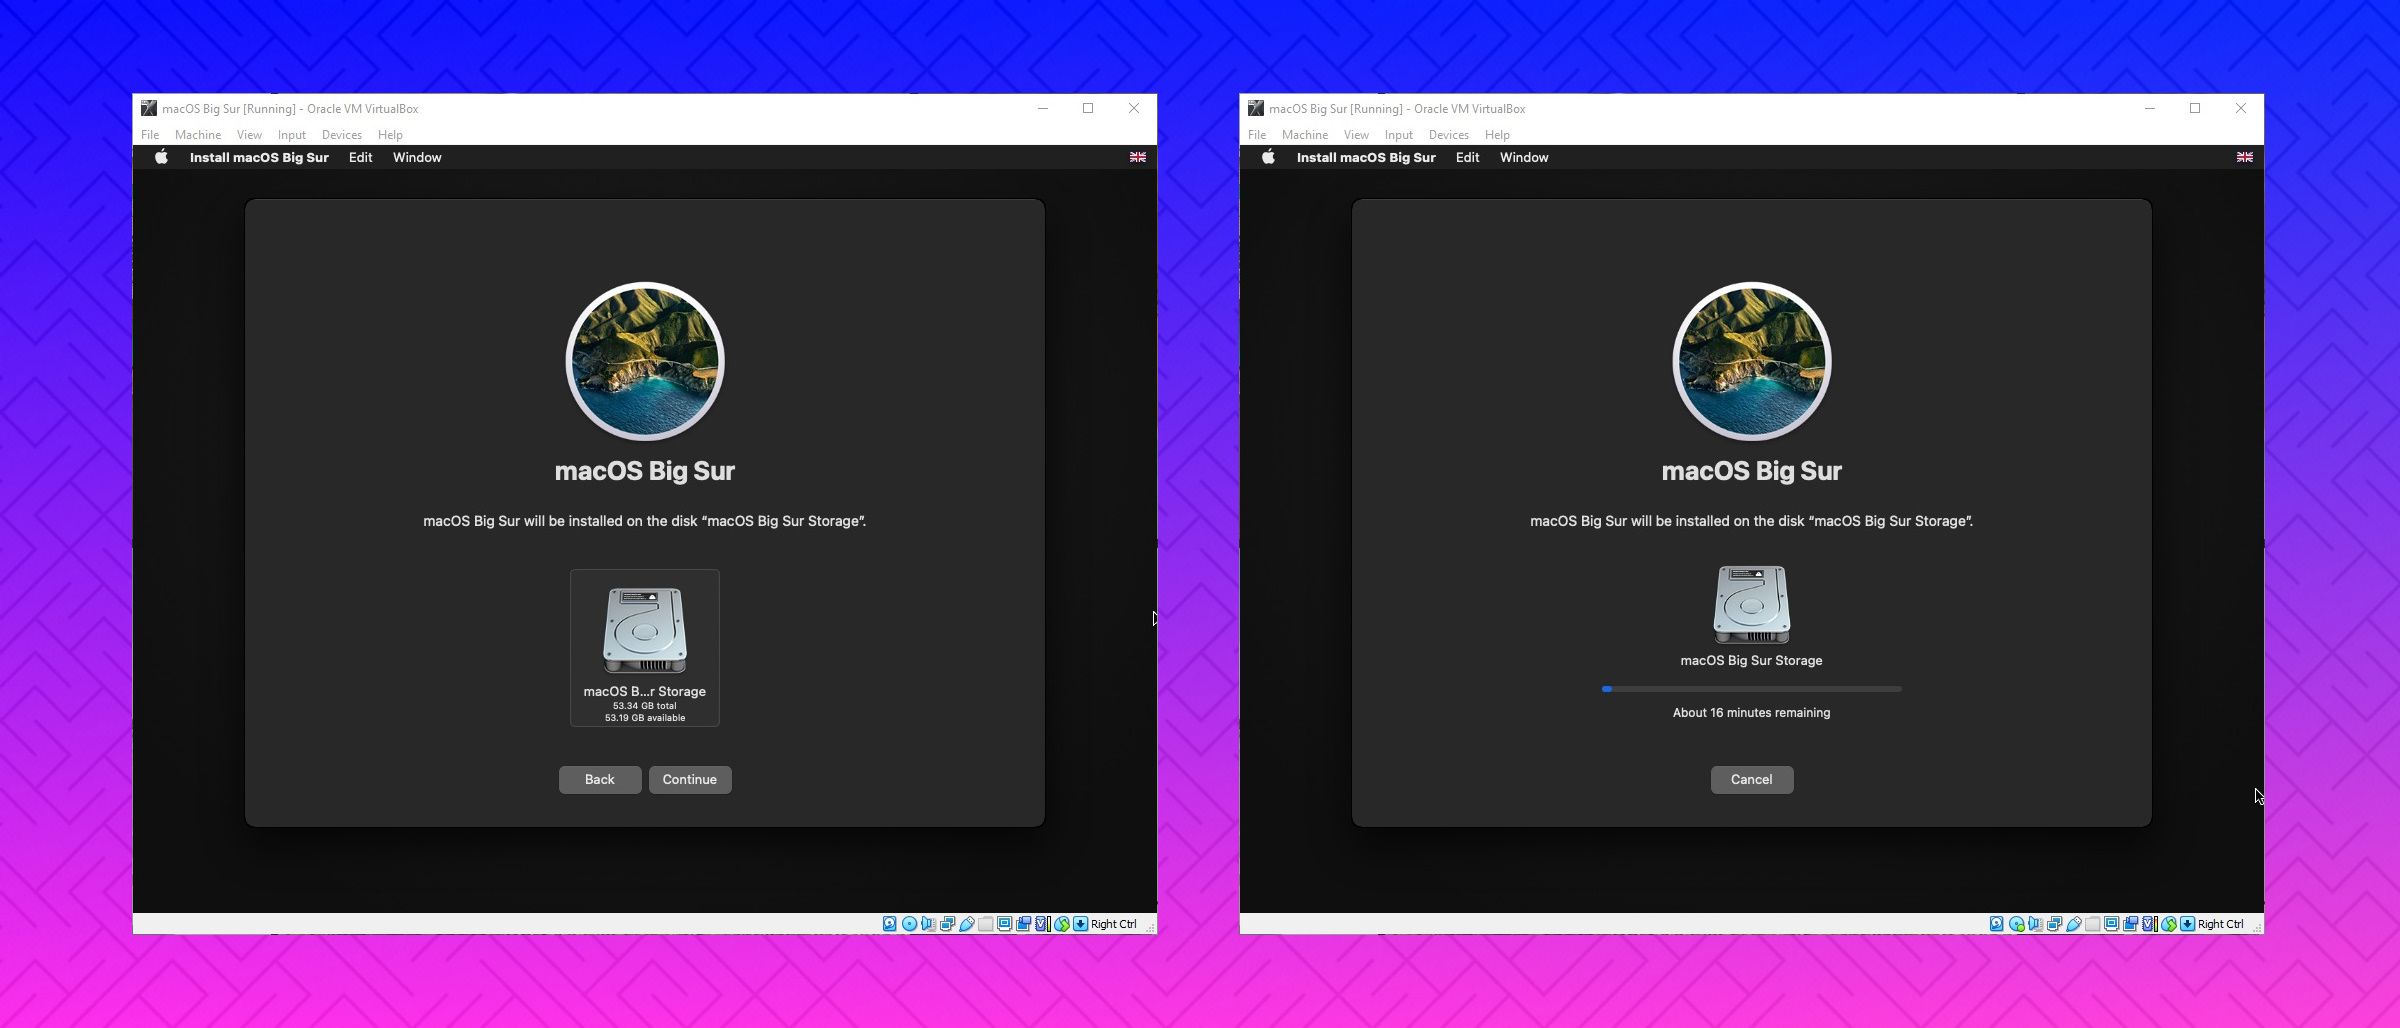
Now, the installation says it'll accept a few minutes. However, in my feel, this wasn't right. The initial installation phase took around 15 minutes, just and then you land on a second installation screen afterwards the macOS Large Sur virtual machine restarts.
The initial installation time on that screen begins at around 29 minutes. However, in one case it reaches Less than a infinitesimal remaining and you get your hopes up—don't.
Information technology took another 60 minutes for the installation to complete from this point, simply I've besides read reports of people waiting for upwards of three hours. Worse, there is no way to tell if the installation is ongoing on you're simply wasting your time.
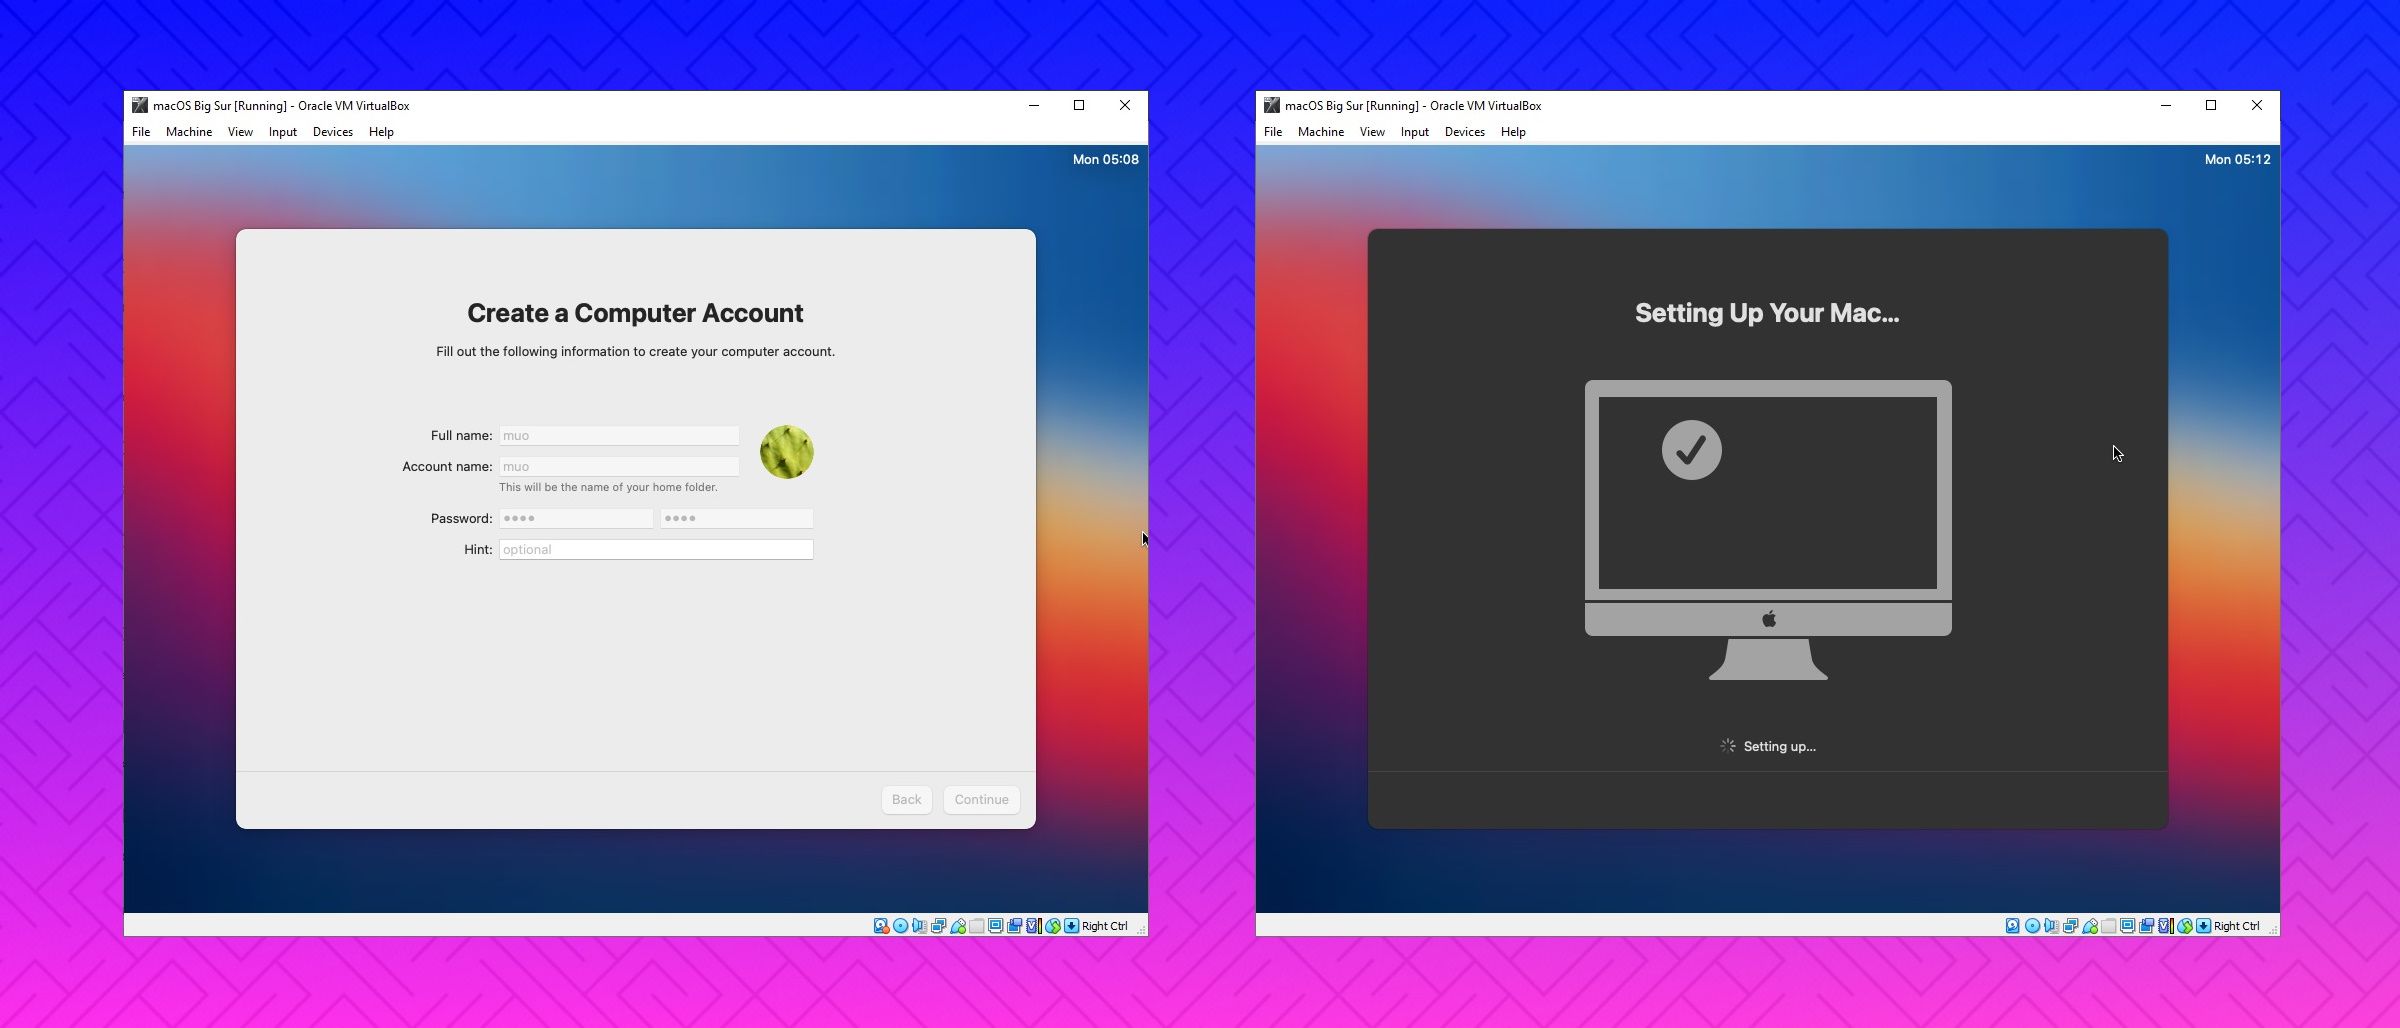
If y'all can afford the time, leave it for several hours, and hopefully, when yous come up back, you'll be staring at the macOS Big Sur Welcome folio.
Once you lot complete the macOS setup, take a snapshot within VirtualBox. Caput to Automobile > Take Snapshot, give your snapshot a proper noun, and wait for it to process. If anything breaks or the Big Sur virtual machine corrupts, you lot tin can head back to the snapshot to restore your previously proficient installation.
How to Create a macOS Large Sur Virtual Machine Using VMware Workstation Histrion
Adopt VMware over VirtualBox? You can create a macOS Big Sur virtual machine using VMware that works exactly the same as VirtualBox. And, merely every bit with VirtualBox, VMware as well requires patching before the macOS Large Sur virtual machine will piece of work.
This role of the tutorial works for Intel and AMD systems. AMD users must use the second code snippet when editing the virtual machine VMX file. Read through the tutorial to see what this means exactly.
1. Patch VMware Workstation Player
- In the "Download macOS Big Sur Virtual Image" department is the VMware Player Patch Tool. Before commencing whatsoever further, download the patch tool.
- Scan to the location you downloaded the patch tool to. Extract the contents of the archive. This process works all-time when the folders are on the same drive (e.thousand., the VMware root folder and extracted archive are both constitute on the C:\ drive).
- Brand sure VMware is completely closed. In the Unlocker folder, right-click the win-install command script and select Run as Administrator. The script will open a Control Prompt window, and the patch script volition run.
Do pay attention. The script whizzes by, and you demand to keep watch for any "File not Found" letters.
The about mutual reason for a "file not found" or a "system cannot find the file specified" message is installing VMware Workstation Player in a dissimilar location to the default folder and executing the patch from a dissimilar directory.
Once the patch completes, you can open VMware.
2. Create the macOS Big Sur Virtual Car with VMware
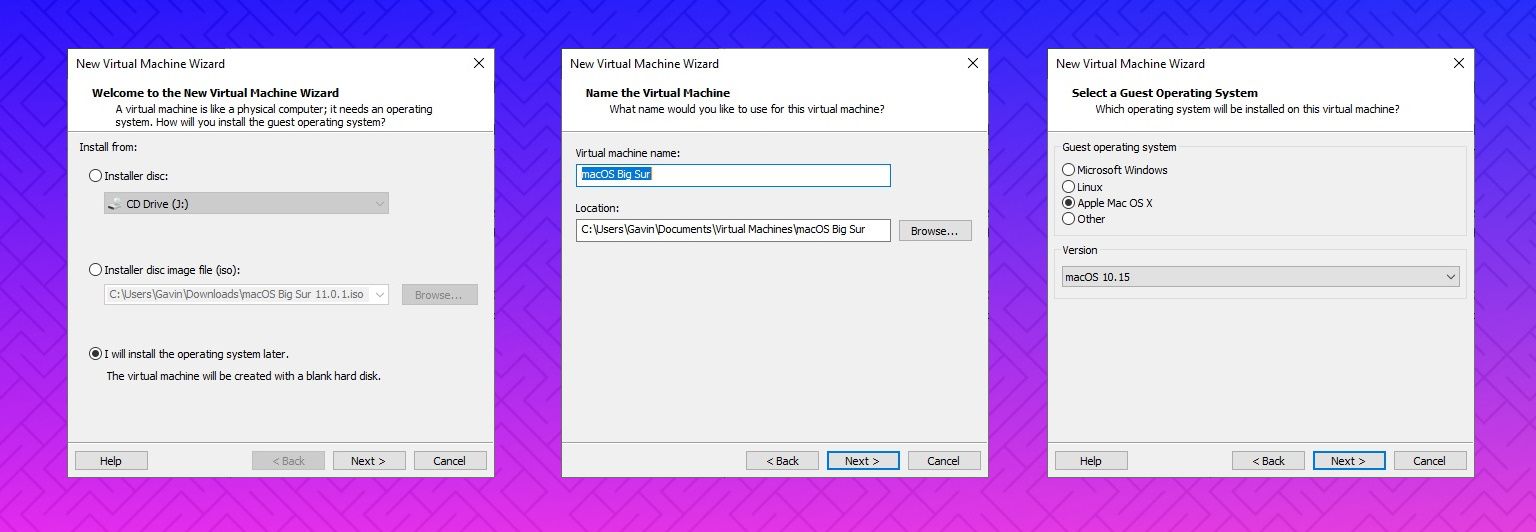
- Select Create a New Virtual Motorcar. Choose I will install the operating system afterward.
- At present, select Apple Mac Bone X, and modify the Version to macOS 10.sixteen. If you don't run into the macOS options, information technology is because the patch didn't install correctly.
- Adjacent, you need to choose a name for your macOS Big Sur virtual machine. Choose something easy to call up, and so copy the file path to somewhere handy—you're going to need it to brand some edits in a moment.
- On the next screen, set a disk size of 50GB or larger and select Shop virtual deejay equally a single file. Complete the virtual disk creation wizard, but do not start the virtual machine just yet.
iii. Edit the macOS Big Sur Virtual Machine Settings
Before you can boot the virtual machine, you must edit the hardware specification.
- From the principal VMware screen, select your macOS Big Sur virtual machine, then right-click and select Settings.
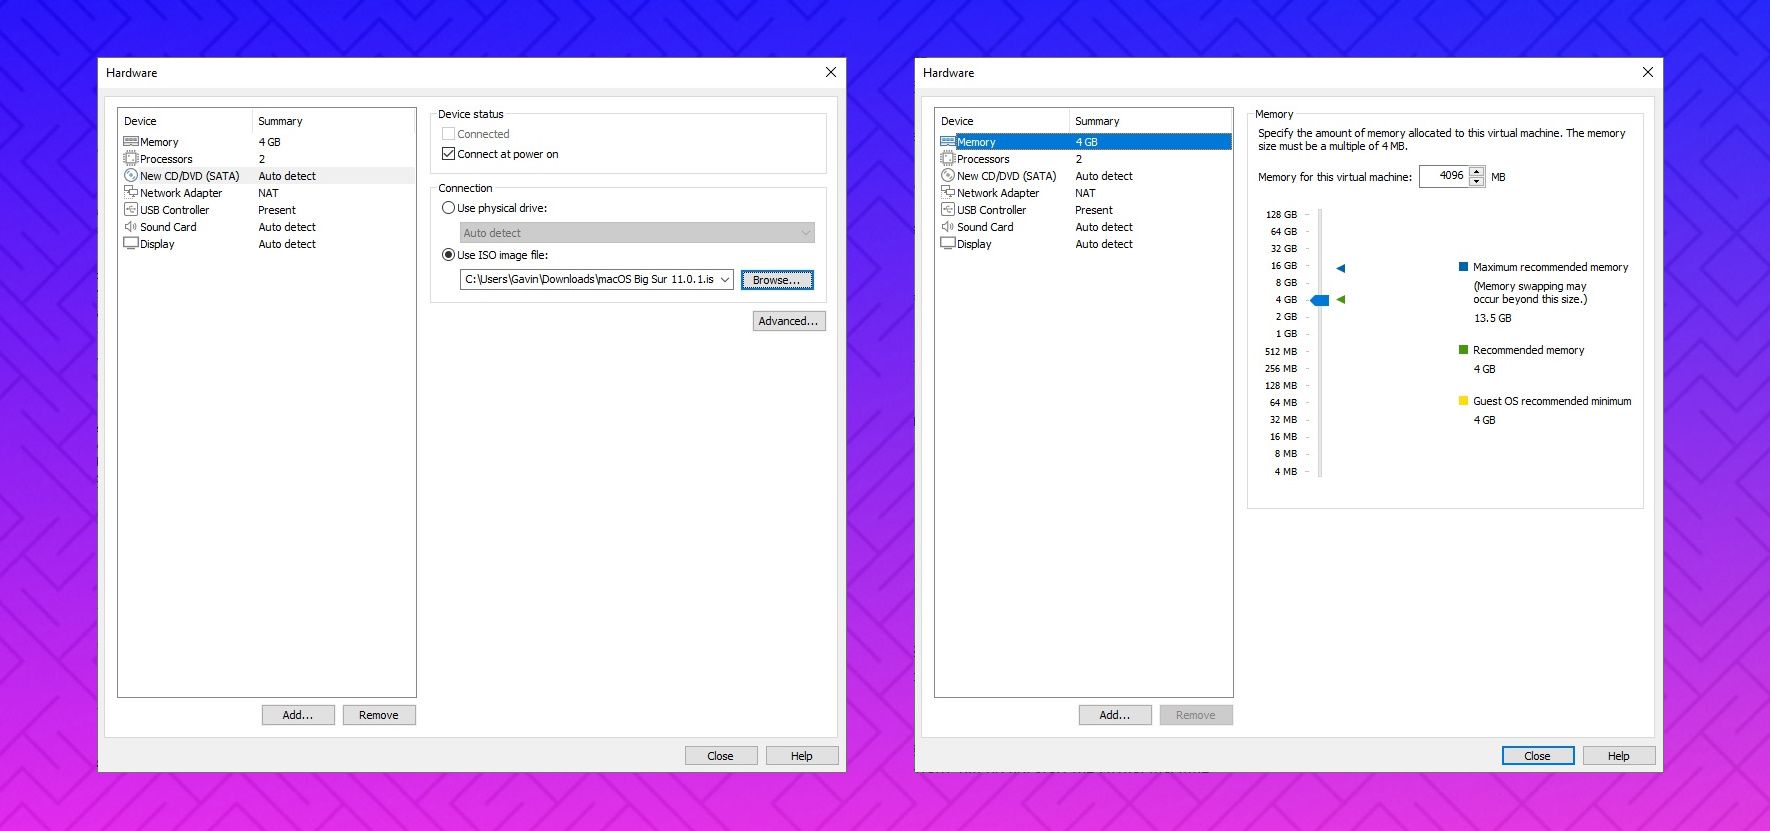
- Bump the virtual machine memory up to at least 4GB. Yous can allocate more if you lot accept RAM to spare.
- Under Processors, edit the number of bachelor cores to ii (or more if bachelor).
- Now, select New CD/DVD (SATA) > Employ ISO image file. Scan to the macOS Big Sur ISO file and select it.
- Close the Hardware window, and select Finish.
Nevertheless, don't start the VMware Workstation Thespian macOS Big Sur virtual automobile just yet. There are however some edits to make to configuration files.
iv. Edit the macOS Big Sur VMX File for Intel Hardware
This section is for Intel users, and information technology involves the final prepare of edits you lot demand to make before switching your VMware macOS Large Sur virtual automobile on!
Close VMware. Caput to the location y'all stored the macOS virtual machine. The default location is:
C:\Users\YOURNAME\Documents\Virtual Machines\YOUR MAC Bone Ten FOLDER Scan to macOS Big Sur.vmx, correct-click, and select Open with > Notepad (or your preferred text editor). Coil to the lesser of the configuration file and add the post-obit line:
          smbios.reflectHost = "TRUE"
hw.model = "MacBookPro14,three"
board-id = "Mac-551B86E5744E2388"
smc.version = "0"
Save, and then Exit.
You can at present open VMware, select your macOS Big Sur virtual auto, and fire information technology up!
5. Edit the macOS Big Sur VMX File for AMD Hardware
This section is for AMD users. Like the higher up department, AMD users must also edit the VMX file before proceeding. The AMD edit involves a few more lines than the Intel version, but you can copy and paste the data into the file.
Shut VMware. Head to the location you stored the macOS virtual machine. The default location is:
C:\Users\YOURNAME\Documents\Virtual Machines\YOUR MAC Bone X Binder Browse to macOS Large Sur.vmx, right-click, and select Open up with > Notepad (or your preferred text editor). Scroll to the lesser of the configuration file and add together the post-obit lines:
          smc.version = "0"
cpuid.0.eax = "0000:0000:0000:0000:0000:0000:0000:1011"
cpuid.0.ebx = "0111:0101:0110:1110:0110:0101:0100:0111"
cpuid.0.ecx = "0110:1100:0110:0101:0111:0100:0110:1110"
cpuid.0.edx = "0100:1001:0110:0101:0110:1110:0110:1001"
cpuid.one.eax = "0000:0000:0000:0001:0000:0110:0111:0001"
cpuid.one.ebx = "0000:0010:0000:0001:0000:k:0000:0000"
cpuid.1.ecx = "1000:0010:1001:chiliad:0010:0010:0000:0011"
cpuid.1.edx = "0000:0111:1000:1011:1111:1011:1111:1111"
smbios.reflectHost = "Truthful"
hw.model = "MacBookPro14,3"
board-id = "Mac-551B86E5744E2388" Save, then Exit.
Y'all can now open VMware, select your macOS Big Sur virtual machine, and fire it upwards!
6. Configure and Install the macOS Big Sur Virtual Auto
After launching the macOS Big Sur virtual machine, you'll accept to configure the storage drive before installation.
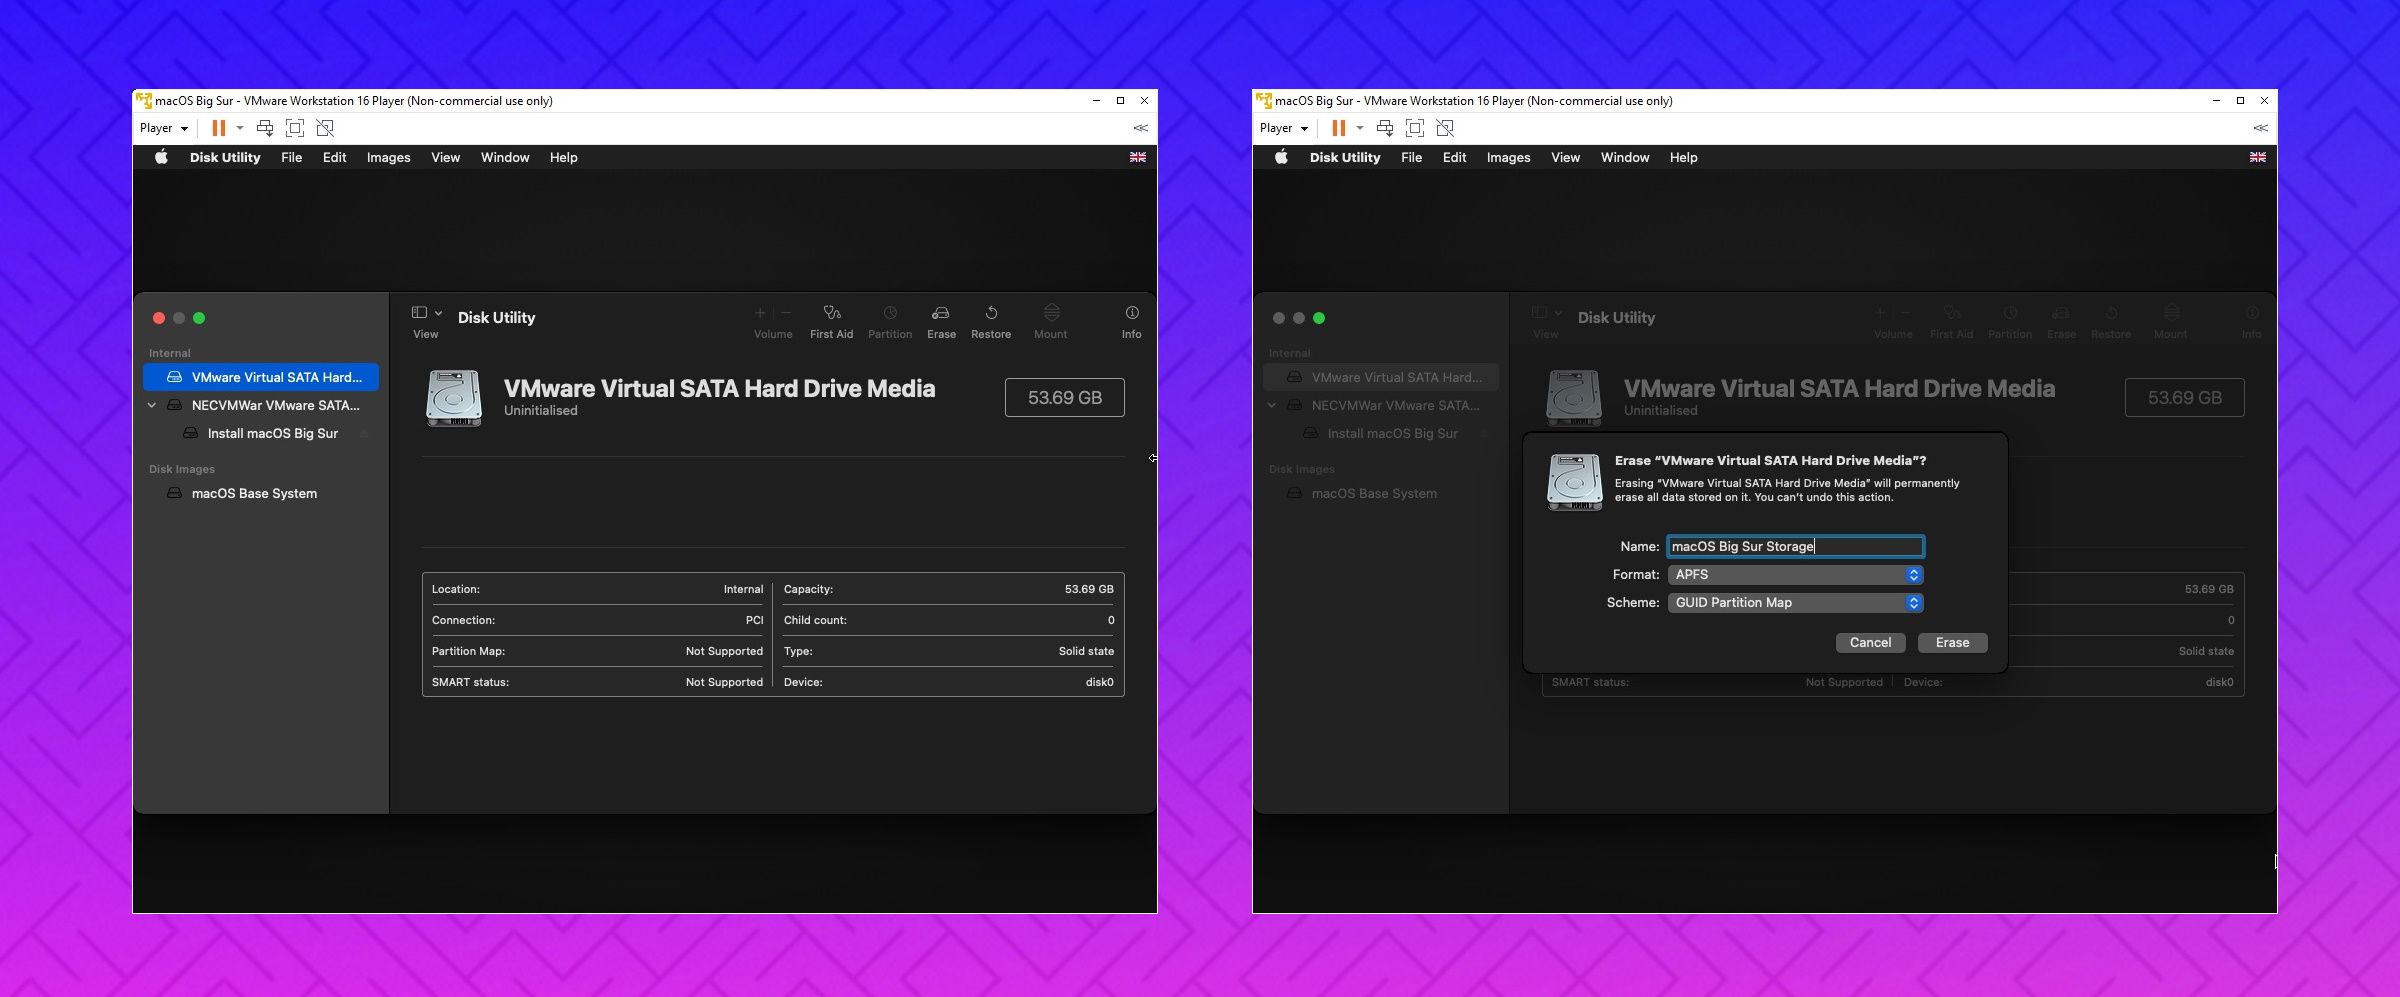
- Next, select Disk Utility. You create a make clean drive for macOS Big Sur to install to.
- In the Disk Utility, select VMware Virtual SATA Hard Drive Media from the Internal drive column.
- After selecting the drive, head to the Erase selection constitute at the pinnacle of the utility.
- Give your drive a name, fix the Format to APFS, and the Scheme to GUID Partitioning Map.
- Select Erase.
- Once complete, you lot tin exit the Disk Utility dorsum to the Big Sur recovery screen. From here, y'all should select Install macOS Big Sur.
- Select the drive you created in the Disk Utility, followed by Continue.
The installation process takes a while, just it is faster than VirtualBox. Once macOS Big Sur loads, you lot tin can configure the operating organization as you see fit.
7. Install VMware Tools to Your macOS Big Sur Virtual Motorcar
You lot now need to install VMware Tools, which is a set of utilities and extensions that improve mouse treatment, video performance, and other useful things.
With the macOS virtual machine running, head to Player > Manage > Install VMware Tools.
The installation disc will announced on the macOS desktop. When the option appears, select Install VMware Tools, so allow it admission to the removable book. Follow the guided installer, which will require a restart on completion.
Troubleshooting
A couple of things tin can go wrong during the macOS virtual machine installation in VMware Player Workstation.
- If you cannot meet "Apple Mac OS X" during the virtual machine cosmos wizard, and then you need to revisit the patch procedure. Ensure every procedure associated with VMware Player is off.
- If you receive the message "Mac Bone X is non supported with binary translation" when starting the virtual auto, at that place is a potent take chances yous need to activate virtualization in your BIOS/UEFI configuration.
- If y'all receive the bulletin "VMware Player unrecoverable error: (vcpu-0)" when starting the virtual car, you need to head back to the macOS Big Sur.vmx configuration file to ensure you added the extra line and saved the edit.
- If you're running AMD hardware and get stuck at the Apple logo, first ability off the virtual auto. At present, caput to Settings > Options > General. Change the Guest operating system to Microsoft Windows and the Version to Windows ten x64. Press OK, so try to power upward the virtual machine again. Once the Apple tree logo passes, ability down the virtual machine, so set the Invitee operating arrangement option back to Apple tree Mac OS Ten, selecting the right version.
macOS Virtual Machines for AMD Hardware
Apple uses Intel hardware to power desktops and laptops. Configuring a macOS virtual car using Intel hardware is easier because the hardware specifications are very like.
With AMD, the reverse is true. Because Apple does not develop macOS on AMD hardware, creating a macOS virtual machine on an AMD arrangement is trickier. However, you can check out the following video tutorial to learn how to install macOS Big Sur on a VMware virtual machine using AMD hardware.
macOS Big Sur Virtual Auto Installation Complete
You have two options to cull from for your macOS Big Sur virtual machine. Both options are great if you want to give macOS a endeavour before making the switch from Windows and enjoy some of the all-time Apple apps on offer.
Nigh The Author 
DOWNLOAD HERE
Posted by: nelsonaporing.blogspot.com

